
速盈注册
Handbook Markdown Guide
发布时间:2025-08-14 05:56:51 浏览次数:
The guide covers usage of Markdown. If you’re looking for something and can’t find it, it may be on the shortcodes page.
This website was generated by Hugo, a blog-aware Static Site Generator (SSG) widely used by web developers. Markup language is part of the structure of any SSG. It is a system to write documents making them somehow syntactically distinguishable from text. Lightweight markup languages have a simplified and unobtrusive syntax, designed to be easily written within any text editor. That’s what we use to write our content. The majority of SSGs use markdown engines for this purpose. Read through our blog post on Modern Static Site Generators to understand how they work.
For The GitLab Handbook we use Goldmark, which is an advanced Markdown engine written in Go and comes bundled as part of Hugo. It implements the CommonMark markdown standard, it’s is extensible and very fast at transforming Markdown to HTML. As such, we encourage use of Markdown as much as possible, though we allow HTML inline (MD033).
If you never have written a single line in markdown markup, don’t worry, it’s easy to learn and even easier to use. You’ll probably be surprised how handy it is once you get used to it. And you’ll miss it whenever the tech you’re using doesn’t support markdown.
In most of GitLab text areas you’ll find markdown support. We have a number of markdown engines in GitLab so the markup will not behave equally “GitLabwide”. For GitLab.com, GitLab CE and GitLab EE text areas, the markdown engine is currently CommonMarker. Here you can find the markdown style guide for them. In the for the handbook projects, you’ll see Kramdown used.
This guide has been made to make it easier for everyone to use Hugo and Goldmark features and save a lot of time writing content for The GitLab Handbook .
There are different possible syntaxes for most of the markups described below, but this guide is to be considered the standard for The GitLab Handbook .
For information on how markdown is verified in the pipeline, refer to the development docs. Relevant customized markdownlint rules are noted in the format .
Content headings should be descriptive enough to suggest their corresponding content when they or corresponding fragment identifiers are seen out of context. Fragment identifiers are automatically generated from most headings. Keep that in mind when choosing your headings.
Heading h4
Notes on heading structure:
- We don’t use headings, as they already are displayed on every page as its title, and we should not apply more than one per page (MD002, MD041).
- Always start with (), and respect the order h2 → h3 → h4. Never skip the hierarchy level, such as
h2 → h4.
The six heading elements, H1 through H6, denote section headings. Although the order and occurrence of headings is not constrained by the HTML DTD, documents should not skip levels (for example, from H1 to H3), as converting such documents to other representations is often problematic. W3C
- To prevent confusion, headings at the same level should not be duplicated (MD024).
Notes on individual headings:
- We enforce using the style of heading, where the heading starts with one or more hashes (MD003).
- Always leave a blank space between the hash and the text next to it, otherwise it won’t render properly.
- Have an empty line before and after, to keep the text clear and the markdown consistent.
- Headings should be no longer than 100 characters (MD013). To make a larger amount of text stand out, use emphasis or shortcodes, such as alerts.
- Headings should not end in punctuation (MD026).
- Headings should not have links in them. The site automatically makes headings anchor links, but links in headings can override the behavior.
- Headings should use sentence case. (Not enforced.)
- While emphasis instead of header is allowed (MD036), it is not recommended.
Regular paragraphs are obtained by just writing text lines. If you hit enter between two lines, both lines will be joined into a single paragraph, which is called wrapping text. But, if you leave a blank line between them, they will split into two paragraphs.
In some Git tools, in future MRs may be easier to understand with additional line breaks, however GitLab’s web interface as well as many desktop Git tools feature substring change highlighting within lines and side-by-side or similar version comparison so there is no need for artificial line breaks.
Splitting long lines (preferably up to 100 characters) can make it easier to provide feedback on small chunks of text. Do not leave blank spaces after the last word of the line broken within a paragraph, unless you want it to be intentionally broken with a .
Regular paragraphs and automatic join
This text is a paragraph. This won't be another paragraph, it will join the line above it.
This will be another paragraph, as it has a blank line above it.
In case you need an additional break (or some extra space between lines), you can simply use the HTML break tag , leaving blank lines above and below it:
Text A
Text B
A sequence of three or more dashes will produce a horizontal line, but let’s use always 3 as standard (MD035). Leave blank lines after and before it:
Text
Text
To display bold or italic text, wrap it in underscores for italic, or 2 asterisks for bold. For both italic and bold, wrap it in 3 stars:
This is bold and this is italic.
This is bold and italic.
While single asterisks can be used for italic, and 2 underscores can be used for bold, the described usage above is the preferred formatting. The linter does not enforce these guidelines though, and only checks for consistency on the page. (MD049, MD050)
Markdown doesn’t natively support underlined text. If necessary you can hardcode it with the HTML tag (), however, it is inadvisable to do so.
There are a few different ways to display links with markdown markup, but to keep some standards, let’s try to use the following options only.
Important notes
- Don’t take it as a restrictive rule, but avoid using meaningless text for links as “this article” or “read here.” The link text should be meaningful even if taken out of context; this makes the links more useful and accessible for people using screen readers.
We’d rather use inline links, such as , as they are easier to maintain. To make an inline link open in a new tab, you can add {:target="_blank"} to the end. Ex:
Use relative links when referring to links found on the same handbook site: for the public handbook, and for the internal handbook.
When linking to a heading on the same page, use .
When linking to other pages within the same handbook (or repository), use relative links. You can either link to the markdown file (which is the easiest when using the editor) or the final version of the link. Some examples:
| Page you’re editing | Page you’re linking to | Link to the markdown file | Link to the final version |
|---|---|---|---|
Alternatively, you can link to the final version of the page link without the domain if it’s in the same handbook. For example, a link to our blog handbook page should look like this and not this .
Only use the absolute (not relative) link, including the domain , if the page is not in the same repository. For example, if you are editing the public handbook and need to link to an internal handbook page.
Hugo can reference reference pages without having to use the full relative path. However, for consistency and easy of use, we use plain Markdown links, and avoid using the Hugo or shortcodes.
For links to GitLab.com or anywhere else, you must use the entire link, including the .
While reference (identifier) links can be used, they are discouraged.
If you’re adding an email address to a page be sure to format your link with to avoid creating broken links. For example,
Both ordered and unordered lists are very straightforward to produce. There are a few ways to produce the same results, but let’s stick with the following, again, to maintain some standards.
- Always start list items with a capital letter.
- Always leave a blank line before and after a list. Though this is currently not enforced (MD022).
- Begin a line with spaces (not tabs) to denote a nested sub-item. Items nested in lists should always align with the
first character of the list item.
- For Unordered lists, use two spaces for each level of indentation. Though this is not currently enforced (MD007).
- For Ordered lists, use three spaces for each level of indentation.
Tip: don’t leave blank lines between the items, unless you have a reason to do so.
Important
Always leave a blank line between Headings and the subsequent list! If you don’t, the list will not render.The Writing Style Guide recommends using ordered lists when you have multiple items, because .
See the Documentation Style Guide for other helpful tips.
Ordered lists are pretty easy to create. Couldn’t be more intuitive:
Paragraph:
- Item one
- Sub item one
- Sub item two
- Sub item three
- Item two
To be practical and avoid errors on the numbers, use “1” for all the items. The markdown engine will output them in the correct order.
Paragraph:
- Item one
- Sub item one
- Sub item two
- Item two
- Item three
Unordered lists are very easy to create too:
Paragraph:
- Item 1
- Item 2
- Item 3
- Sub item 1
- Sub item 2
- Item 4
Let’s say, for some reason, you want to split a list in different parts. To do that, use the markup to indicate the end of a list and the beginning of the next:
- list one - item 1
- list one - item 2
- sub item 1
- sub item 2
- list one - item 3
- list two - item A
- list two - item B
- list three - item i
- list three - item ii
To insert images to your markdown file, use the markup . The path can either be relative to the website, or a full URL for an external image. The supported formats are , , . You might be able to use some files too, depending on its structure.
Images should be added to the folder in the handbook repository, using subdirectories as necessary for organization. For example, to be used on the page, and using the path . Note that this is enforced for images being added.
As images added in this way will not render in the markdown editor preview, use review apps instead.
All images should be 100KB or less, ideally, 25-50KB. Consider compressing images and using the PNG format. The handbook linter checks for a maximum of 500KB, except SVG files.
If you want to add a caption to your image, it’s easily achieved with:
For clickable images, simply wrap the image markup into a link markup:
 My caption
Important notes
- Only screenshots and public domain images are permitted.
- The text inside the square brackets is an image attribute called , which stands for alternative text. Including descriptive alt text helps maintain accessibility for every visitor and should always be included with an image. When you add alt text, be sure to describe the content and function of an image. In addition to the accessibility benefits, is useful for SEO, and it is displayed when, for some reason, that image is not loaded by the browser.
- For the same reasons, the image must contain a name related to it. Example: instead of , name it , if it’s a photo of a black dog.
- It’s also recommended to add an image title for a longer description when necessary. The formatting is shown in the example above with the “Hello World” text.
There are two ways to insert diagrams with Markdown:
- Mermaid
- PlantUML
See the examples in the GitLabm docs on how to use Mermaid. We have a number of Handbook-specific example in the Tools and Tips Section.
You can use PlantUML in Markdown blocks. For example:
There are multiple ways of displaying videos:
- Using a shortcode (preferred method).
- Within tags.
- Within HTML5 tags.
Note that videos, along with all other files, have a maximum limit of 15MB.
Prefer shortcode
Please check for a shortcode for the hosting site, such as YouTube and Vimeo, before using this method.This method works for any embed video within an tag.
- Copy the code below and paste it into your markdown file. Leave a blank line above and below it. Do NOT edit the code block (such as, remove spaces - the video iframe may not render properly)
- Go the video URL you want to display
- Click on “Share”, then “Embed”
- Copy the source () URL only, and paste it replacing the below:
We recommend one of the common formats, such as and .
Videos should be added to the folder in the handbook repository, using subdirectories as necessary for organization. For example, to be used on the page, and using the path . Note that this is enforced for images being added.
This method works for any video uploaded to somewhere retrievable from the internet from a URL, or from a relative path like .
- Read through the w3schools HTML5 video guide, or the MDN guide
- Record or export the video in these three formats to achieve cross-browser and cross-device compatibility: or .
- Get the URL for your video
- Choose an image to use as a poster
- Copy the code below and paste it to your file
- Replace the URLs for your video URLs
Note
In case you don’t have all formats recommended by w3schools, you can use just one of them, but your video most likely won’t be supported in all devices and browsers. The video above ( only) worked on Mozilla Firefox for macOS, Android, and Windows, and on Chrome for Android, and for Windows. But it may not work on other devices/browser, such as Chrome for macOS and iOS, or Safari. In fact, the best option is using YouTube or Vimeo embed videos in tags.To display multiple videos on the same page, just repeat the code block where you want them to show up, replacing the video ID with the respective ID corresponding to your videos.
To display multiple videos in a sequence, just copy the code block and paste it as many times as necessary. Always leave a blank line between the blocks. Do NOT remove the spaces, otherwise your videos may not render properly.
Tables for markdown are challenging. So, we have two possible approaches: use markdown whenever possible, but if you need pretty advanced table layouts, you are free to add them in HTML markup instead.
Markdown is not a replacement for HTML, or even close to it. (John Gruber As explained by John Gruber, the creator of markdown, it was not created to replace HTML, so there are situations we can’t avoid using HTML. With complex tables, that’s the case.
Note
For very simple 2 column tables it is better to use lists with strong text in preference to the complexity of using markdown tables.The following table has a header (first line), then markup to define the desired alignment (dashes and colons), then the table body.
However you prepare your table, its design will depend upon the CSS styles defined for them.
| Default aligned | Left aligned | Center aligned | Right aligned |
|---|---|---|---|
| First body part | Second cell | Third cell | fourth cell |
| Second line | foo | strong | baz |
| Third line | quux | baz | bar |
The bars, spaces, and dashes were used symmetrically in the previous example to help future page developers if they need to edit the table’s contents. The symmetry isn’t required.
Some development tools can help you create your own complex table if you need to merge lines or columns, or if you require a more complex layout. This [table generator] may be able to help you do this.
To add a numbered list in a table cell, add a blank line between the heading and the table to render the table correctly. Otherwise, the text and formatting won’t appear.
To create more complex tables, you need to use HTML.
A collapsed content section is used to hide information until a user chooses to reveal it with a click or tap on the summary text. The hidden content is revealed inline. For example, this code:
This is the detailed text. We can still use markdown and HTML in this block.This is the summary text, click me to expand
The GitLab handbook also supports nested details sections.
Lorem ipsum dolor sit amet… Sed ut perspiciatis unde omnis iste natus…First level collapsible item
Second level collapsible item
There are a few options for displaying code blocks with Markdown. Most of them use backticks .
There is the code block. Used this to reference very short bits of code, filenames and folder paths, and programming symbols and objects in a bit of text. The whole line including the code block should read fluidly.
This is an code block.
Note: While indented code formatting is common, we enforce “fenced” for code blocks (MD046).
This is the most common code block you will encounter and use. You can use this to share whole sections of code within a markdown document. The additional syntax highlighting makes the code easier to read and understand. The highlight function supports a large number of languages including Ruby, Python, Rust, Swift, etc.
If a language is not supported, or for text, use or as the language. Markdownlint currently enforces specifying a language.
Indent the text of each item in 2 white spaces (for unordered lists) or 3 white spaces (for ordered lists). Leave blank lines between the code block and the list items, and indent the code block in 5 white spaces:
- Item 1
- Item 2
```ruby def hello puts "Hello world!" end ```
- Item 3
Blockquotes are good resources to mentioning someone else’s quotes. Also, can be used to emphasize a sentence or a small paragraph.
This is a blockquote. On multiple lines. That may be lazy.
This is the second paragraph.
This is a paragraph.
A nested blockquote.
- lists too
and all other block-level elements.
Even a code block:
There are two types of comment which can be used. The first allows you to leave comments in a markdown file which can only be viewed in the repository and are not rendered to HTML or included in a pages source. The second type is a standard HTML comment which will be included in the pages source.
See comments shortcode.
It is also possible to use HTML comments. These differ in that they are also included in the rendered pages source.
This is a paragraph … paragraph continues here.
Typically you shouldn’t need anchors as well structured documents with headings should prove a good route to linking to text you may want to reference on another page. All headings act as anchors on a page. However there maybe times when you need it, such as if you have an icon in the header.
There are multiple ways to add an anchor.
The extended markdown syntax includes anchors, or heading IDs.
This small shortcode will drop an anchor in a page which you can reference from the same page or another page. The text in quote marks is the name of anchor you’ll use when linking to it.
One of the more powerful features of using Markdown is the ability to mix HTML and Markdown in the same document. With this in mind it is also possible to use normal HTML to create an anchor in a page. This is the method you need to use when adding anchors to markdown documents not in the GitLab Handbook.
Hugo and Docsy provide support for using both Emojis and Font Awesome to provide icons and simple graphics to spice up your content.
To insert emojis in to content you can use the same syntax as you find on GitLab and Slack. Use a followed by the name of the emoji followed by another . Its also possible to look up emojis on the ‘Emoji Cheat Sheet’.
Note: When copying from the cheatsheet it includes the colons for you.
I GitLab
I :orange_heart: GitLab
Font Awesome is loaded indirectly through the Docsy theme. The icon library provides thousands of free to use and open source glyphs and icons which can be embedded into handbook content. The easiest way to use Font Awesome is to copy the HTML for the glyph directly from the Font Awesome Icon gallery and paste it directly in to your content.
It is recommended to use the review app to preview the changes. At times, the loaded version of Font Awesome is not the latest.
Note: The minimum requirement is one of the base classes (such as or ) and the icon class (such as ).
Splash of color
It is possible to add a splash of color to Font Awesome icons by adding (for example ) to the end of the class definition. Where it says color you can replace this with any of the available shortcode colors.
See panels shortcode.
It’s easy to embed Google Docs, Sheets, Slides, and pretty much everything that provides an iframe to use with. The only thing you need to do is use the following code inside your markdown file and replace the iframe from the document you want to embed:
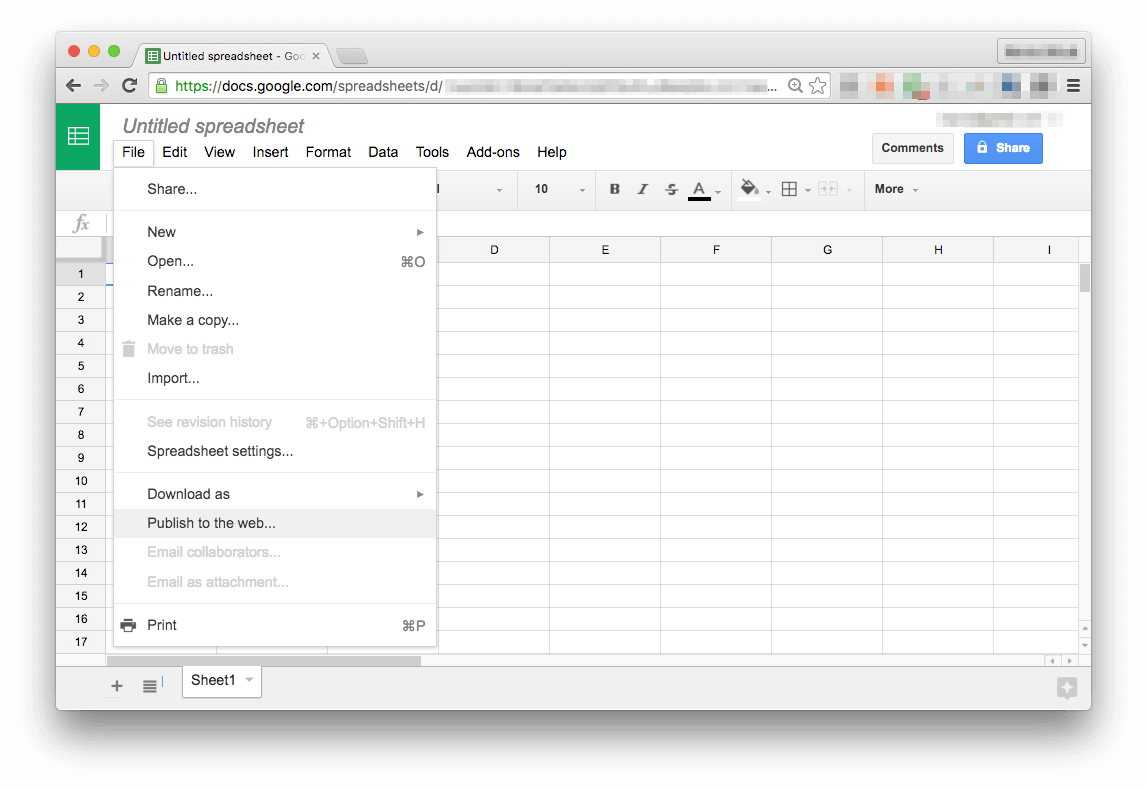
For Google products, with your document opened, click File -> Publish to the web. For example, here’s what Google sheets will look like:
Choose Embed, check your settings, click on Publish and copy the . Then go to your markdown file and wrap the iframe into a short code. The shortcode makes the iframes the right size on the page and allows them to be resized by the user.
Google Sheets
Let’s exemplify with this [simple spreadsheet]. Follow the info above to find the iframe:
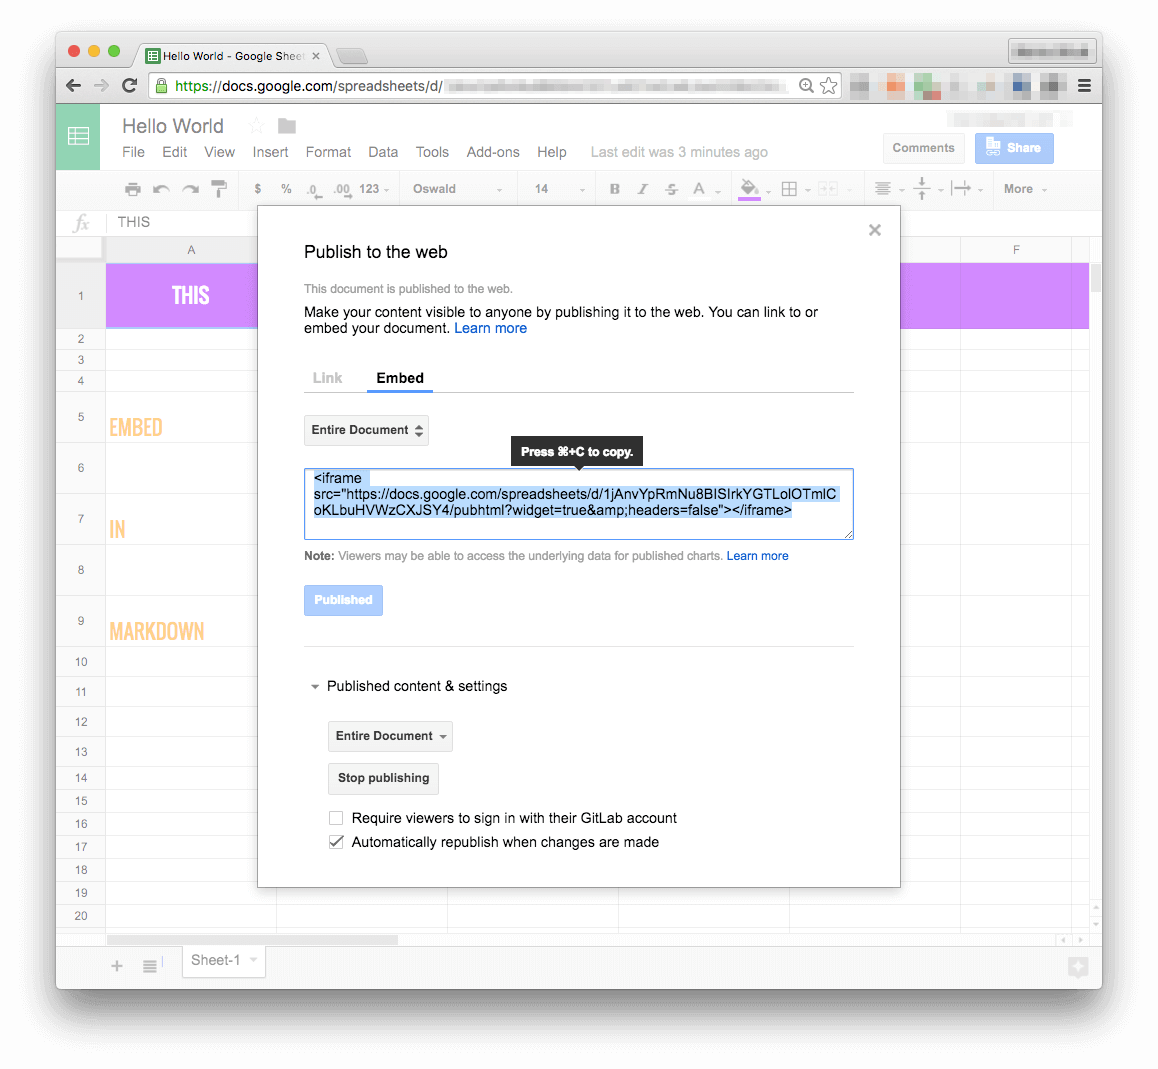
Copy the code below and paste to your markdown file (leave a blank line above and below it). Then replace the with your own:
Google Slides
Let’s exemplify with this GitLab slide deck. Follow the steps above to find the iframe:
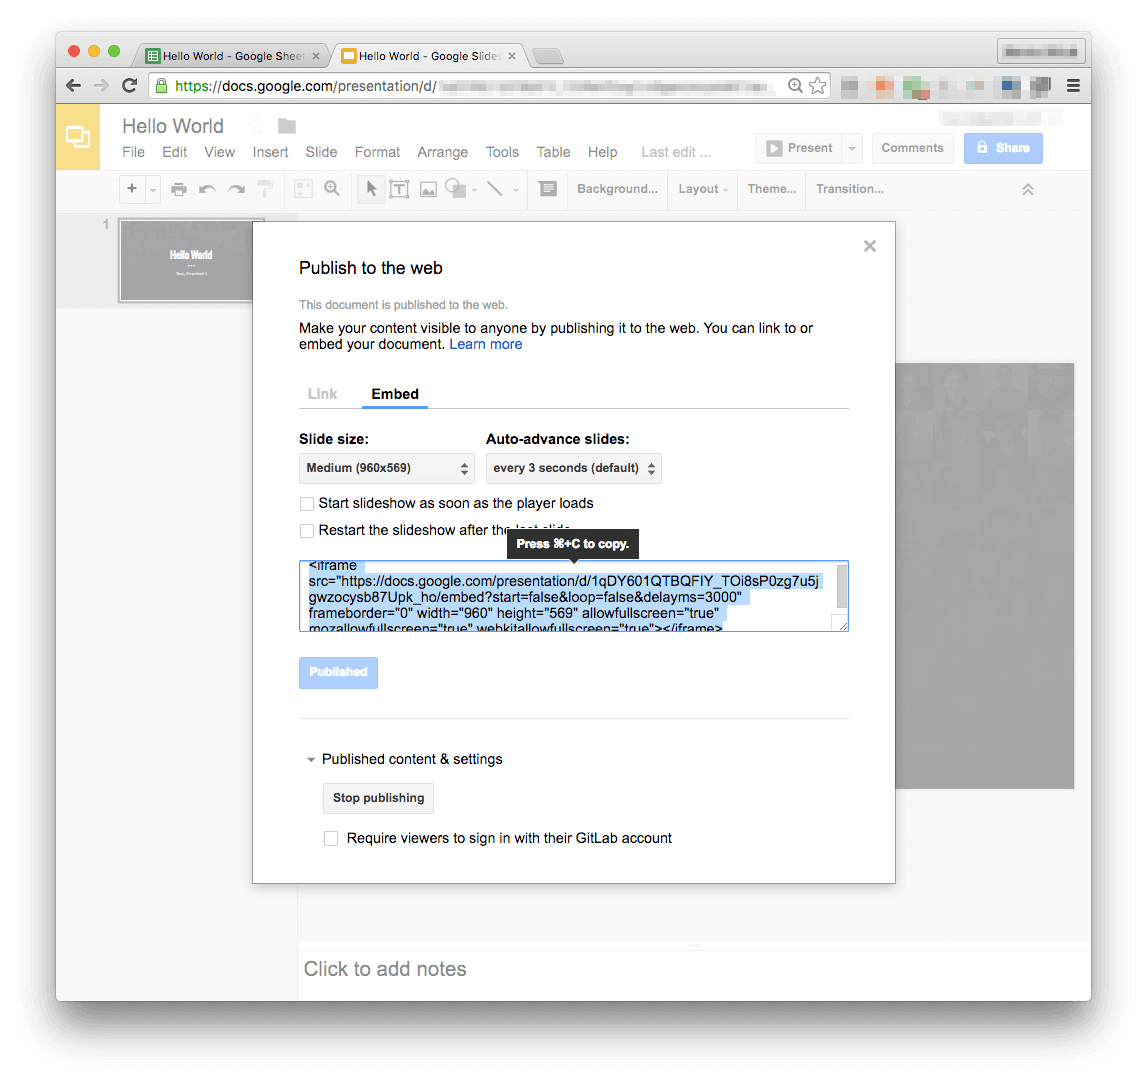
Copy the code below and paste to your markdown file (leave a blank line above and below it). Then replace the with your own:
Google Docs
Warning
Embedding Google Docs is not a recommended practice. Prefer converting your document content to markdown instead.If you need to embed it anyway, follow the same instructions and the same logic as we presented for Google Sheets and Slides, wrapping the with a shortcode:
X/Twitter changed its usage policy, and might add rate limits. Sometimes, tweets cannot be loaded when embedded, and fail CI/CD builds or the deployed handbook (see the issue discussion). Create a screenshot of the tweet instead, and upload the image into the handbook.
To embed GitLab Snippets to a markdown file, copy the embed code from your public snippet and paste it in the file.
Other embeds can be included in the handbook, as outlined in Embed documents. However, due to privacy (especially cookie) concerns, we recommend only embedding from sites outlined in our tech stack, or where “no cookies” can be specified.
Mathematical and other formulae are supported through the use of LaTeX markup. The Hugo implementation uses the MathJax engine.
The frontmatter parameters must have set to .
This is an inline \(a^*=x-b^*\) equation.
These are block equations:
\[a^*=x-b^*\]
\[ a^*=x-b^* \]
\[ a^*=x-b^* \]
We do not enforce a line length (MD013).
Please use the editors available on GitLab.com, one of the following code editors, or your preferred code editor to write in markdown.
It is not recommended writing your document in a regular text editor like Google Docs, Microsoft Word, or macOS’ Pages, then copy-pasting to markdown, as it most likely will bring some characters with a different encoding (non UTF-8), which will cause the markdown to not render correctly.
In case you don’t have a choice and need to import a text already written in a text editor, paste it to your markdown file using command+shift+V on a Mac, or control+shift+V on Windows or Linux. You might minimize the cause of trouble by pasting without format. But yet, is not guaranteed it is going to work, so double check your output.
If the document was in Google Docs, you can install the Docs to Markdown add-on, which helps convert the Google Docs to markdown. You’ll likely need to make minor updates or edits to the markdown that the add-on generates.
- Markdown editors for Mac: [MacDown], [iA Writer], [Ulysses]
- In-browser markdown editor: [StackEdit]
- Markdown Tables Generator
If you’re not used to writing markdown, these editors can be helpful. Many editors offer real time previews and while these previews may not be exactly the same as the final result they can be a very good approximation, which gives you a good idea of what the output will be while you type.
[StackEdit] is awesome too, you can work on a markdown file even if you’re away from your computer, or out of resources. It works from every major browser and automatically saves your work to Google Drive.
Do you want a simple way of copying a hyperlink title and address in markdown? The Format Link extension offers a quick and easy way to do this, along with allowing you to customize any number of other formats. View detailed instructions and examples.
If you’re looking for just the ability to copy something as markdown, try these Firefox add-ons or Chrome extensions.
-
Words must be separated by one single space only. Do not leave more blank spaces than the necessary, they can render differently than expected and can cause other issues.
-
Do not leave blank spaces at the end of sentences.
-
Always leave a blank line between block-level markup elements, except between list items. Example:
-
As explained above, do not skip headings. Always do h1 → h2 → h3 → h4. Never h2 → h4.
-
Prefer short titles and headings. Do not punctuate them (unless they require a question mark or an exclamation).
-
Try not to punctuate list items, but if you do, be consistent, and do that throughout the list.
-
If you have to mention a non-clickable URL, prefer using backticks: .
-
To add fancy emojis to your file, click on your Mac and check the magic ? or use a website like Emoji Finder. Do not overuse them, please!
-
If you are confused about any markup that you’ve found in this file, you can check its file for reference, where you’ll be able to see exactly how everything was written to produce the results you are seeing on this page.
Anything else you know of and is not described here? Any new magic? Any trick? Please contribute!

地址:海南省海口市58号 电话:0898-88889999 手机:13988888888
Copyright © 2012-2018 首页-速盈娱乐-注册登录站 ICP备案编号:琼ICP备88889999号


 88889999